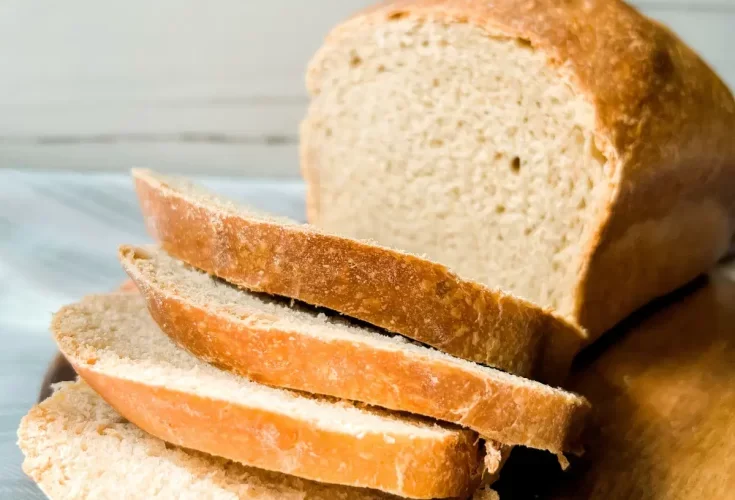
There’s something deeply comforting about baking homemade bread from scratch, especially when it comes to a soft and fluffy sourdough sandwich loaf. With its tender crumb, light texture, and rich flavor, sourdough sandwich bread combines the wholesome qualities of traditional sourdough with the softness needed for everyday sandwiches, toast, and breakfast recipes.
Unlike rustic artisan sourdough bread with a thick crust and open crumb, this soft sourdough sandwich bread is designed specifically for practical daily use. It slices beautifully, stays soft for days, and works perfectly for grilled cheese, peanut butter sandwiches, avocado toast, French toast, or homemade deli sandwiches.
The natural fermentation process not only enhances the taste but also improves digestibility and shelf life. Once you make this homemade sourdough loaf, store-bought bread may never taste the same again.
This easy sourdough sandwich bread recipe is ideal for both beginners and experienced bakers who want bakery-style bread with simple pantry ingredients.
Why This Sourdough Sandwich Bread Is So Popular
Homemade sourdough bread has become increasingly popular because of its incredible flavor, texture, and health benefits. This recipe stands out because it creates a loaf that is soft enough for sandwiches while still delivering the signature tangy sourdough taste.
Soft Texture Perfect for Everyday Use
Traditional sourdough bread often has a chewy crust and airy interior. While delicious, it can sometimes be difficult for sandwiches.
This sandwich loaf is:
- Soft and fluffy
- Easy to slice
- Tender enough for kids
- Ideal for toast and sandwiches
- Light yet sturdy
The enriched dough creates a softer bite that works perfectly for everyday meals.
Rich Flavor from Natural Fermentation
One of the biggest reasons people love sourdough is the flavor.
The slow fermentation process develops:
- Mild tanginess
- Deeper wheat flavor
- Natural sweetness
- Better aroma
Unlike commercial bread that relies heavily on yeast, sourdough develops flavor naturally over time.
Longer Freshness Without Preservatives
Homemade sourdough sandwich bread stays fresh longer than many regular homemade breads because fermentation naturally helps preserve moisture.
This means:
- Softer bread for multiple days
- Better texture
- Less waste
- Improved flavor over time
What Makes Sourdough Bread Special?
Sourdough baking is one of the oldest bread-making methods in the world. Instead of commercial yeast, it uses a naturally fermented starter filled with wild yeast and beneficial bacteria.
This fermentation process:
- Improves texture
- Enhances flavor
- Helps digestion
- Creates natural rise
- Strengthens dough structure
The result is bread with more depth and character than ordinary sandwich bread.
Benefits of Homemade Sourdough Sandwich Bread
Easier to Digest
Natural fermentation breaks down some of the gluten and starches found in flour, making sourdough easier for many people to digest.
This process also helps unlock nutrients in the grain.
Better Nutrient Availability
Fermentation may help increase mineral absorption by reducing phytic acid levels naturally present in flour.
This makes nutrients more accessible to the body.
No Artificial Additives
Homemade sourdough bread contains simple ingredients without unnecessary preservatives or chemicals often found in packaged bread.
Versatile for Many Meals
This bread works beautifully for:
- Sandwiches
- Toast
- Garlic bread
- French toast
- Bread pudding
- Paninis
- Breakfast recipes
Essential Ingredients and Their Purpose
Understanding each ingredient helps create perfect sourdough sandwich bread every time.
Active Sourdough Starter
The sourdough starter is the heart of the recipe.
A bubbly and active starter provides:
- Natural rise
- Flavor development
- Soft texture
- Airy crumb
For best results, use a starter that has been recently fed and is at peak activity.
Butter or Coconut Oil
Butter adds rich flavor and softness to the loaf.
Coconut oil works well as a dairy-free option and still provides moisture and tenderness.
Softened fat blends more evenly into the dough compared to melted fat.
Honey or Sugar
A touch of sweetness balances the tanginess of sourdough.
Honey also:
- Helps browning
- Improves softness
- Adds subtle flavor
- Supports fermentation
Sugar works equally well if preferred.
Salt
Salt is essential for flavor and dough strength.
Without salt, bread tastes flat and lacks structure.
Water
Room-temperature water creates the ideal environment for fermentation.
Water that is too hot can weaken or kill the starter, while cold water slows fermentation dramatically.
Filtered or non-chlorinated water is often best for sourdough baking.
All-Purpose Flour
All-purpose flour creates a soft and tender loaf while still providing enough structure.
Using only bread flour may create a chewier texture, while all-purpose flour keeps the bread softer and lighter.
How Fermentation Improves Bread
The long fermentation process is one of the biggest secrets behind excellent sourdough bread.
During fermentation:
- Wild yeast produces gas for rising
- Flavor develops slowly
- Gluten structure strengthens
- Texture becomes softer
- Digestibility improves
Patience is one of the most important ingredients in sourdough baking.
Step-by-Step Guide to Making Soft Sourdough Sandwich Bread
Step 1: Mixing the Dough
Start by adding all ingredients into a mixing bowl.
The flour should typically go in last to help control hydration.
Mix until a rough dough forms.
At this stage, the dough may feel:
- Slightly sticky
- Soft
- Shaggy
This is normal.
Step 2: Kneading the Dough
Kneading develops gluten, which gives the bread elasticity and structure.
You can knead:
- By hand
- Using a stand mixer
The dough should eventually become:
- Smooth
- Stretchy
- Elastic
- Slightly tacky
This usually takes around 10 minutes.
Understanding the Windowpane Test
The windowpane test helps determine if the dough has been kneaded enough.
Take a small piece of dough and gently stretch it.
If the dough stretches thin enough to let light pass through without tearing, gluten development is complete.
This step is essential for soft sandwich bread.
Bulk Fermentation: The First Rise
Bulk fermentation is where the magic happens.
Place the dough in a warm area and allow it to rise slowly for 10–12 hours.
Depending on room temperature:
- Warmer kitchens rise faster
- Cooler kitchens require more time
The dough should roughly double in size.
Avoiding Over-Fermentation
One of the most common sourdough mistakes is letting the dough ferment too long.
Over-proofed dough becomes:
- Sticky
- Weak
- Difficult to shape
- Dense after baking
If over-fermentation happens, the dough can still be used for:
- Croutons
- Bread crumbs
- Flatbread
Watching the dough carefully helps prevent this issue.
Shaping the Dough Properly
Once the dough has completed its first rise, divide it into two equal portions.
Gently shape each piece into rectangles before rolling tightly into logs.
Proper shaping creates:
- Even texture
- Good structure
- Beautiful loaf shape
- Better oven spring
Place each loaf seam-side down into prepared loaf pans.
The Importance of the Second Rise
The second rise allows the dough to become light and airy before baking.
This stage usually takes:
- 2–4 hours depending on temperature
The dough should rise above the edge of the loaf pan and feel puffy.
Under-proofed dough may split during baking or remain dense inside.
Optional Egg Wash for Bakery-Style Shine
Brushing the tops with egg wash before baking creates:
- Glossy crust
- Rich golden color
- Professional bakery appearance
While optional, it adds beautiful visual appeal.
Baking the Bread
Bake the loaves at 375°F (190°C) until deeply golden brown.
The bread should:
- Sound hollow when tapped
- Have a golden crust
- Reach a fully baked center
Baking time is approximately 45 minutes.
Why Cooling Matters
Fresh bread smells incredible, but slicing too early can ruin the texture.
Cooling allows:
- Moisture to settle
- Structure to stabilize
- Easier slicing
- Better crumb texture
Wait until fully cooled before cutting.
Best Ways to Use Sourdough Sandwich Bread
This bread is incredibly versatile.
Sandwiches
Perfect for:
- Turkey sandwiches
- Grilled cheese
- BLTs
- Egg sandwiches
- Tuna melts
Breakfast Toast
Toast slices and top with:
- Butter
- Jam
- Peanut butter
- Avocado
- Honey
French Toast
The sturdy yet soft texture makes excellent French toast.
Homemade Croutons
Day-old bread makes flavorful croutons for soups and salads.
Tips for Success
Use an Active Starter
A weak starter produces poor rise and dense bread.
Your starter should be bubbly and active before mixing dough.
Don’t Rush Fermentation
Flavor and texture improve with proper fermentation time.
Avoid Too Much Flour
Excess flour creates dry bread.
Soft dough typically creates softer loaves.
Keep Dough Warm
Sourdough thrives in warm environments.
Cool temperatures slow fermentation significantly.
Grease Pans Properly
Well-greased pans help prevent sticking and ensure easy removal.
Troubleshooting Common Sourdough Problems
Why Didn’t My Bread Rise?
Possible reasons include:
- Weak starter
- Cold environment
- Over-proofing
- Incorrect hydration
Why Is My Bread Dense?
Dense bread often comes from:
- Under-kneading
- Insufficient proofing
- Too much flour
Why Is My Crust Too Hard?
Overbaking or excessive flour can create thick crusts.
For softer crusts, brush warm bread lightly with butter after baking.
Storage Instructions
Room Temperature
Store bread in an airtight container or bread bag for up to 5 days.
Freezing
Freeze loaves or slices in freezer-safe bags for up to 6 months.
Thaw at room temperature before serving.
Nutrition Overview
Approximate per serving:
- Calories: 200 kcal
- Carbohydrates: 35g
- Protein: 5g
- Fat: 4g
Values may vary depending on ingredients used.
Easy Sourdough Sandwich Bread Recipe
Soft Sourdough Sandwich Bread
Recipe Information
Course: Sourdough Bread
Cuisine: Homemade Baking
Servings: 24 slices
Prep Time: 20 minutes
Cook Time: 45 minutes
Additional Time: 960 minutes
Total Time: 1025 minutes
Calories: 200 kcal
Ingredients
- 1/2 cup softened butter or softened coconut oil (113 g)
- 2 tablespoons honey or sugar (42 g honey or 24 g sugar)
- 1 tablespoon salt (17 g)
- 1 cup active bubbly sourdough starter (227 g)
- 2 1/2 cups room temperature water (590 g)
- 8 cups all-purpose flour (1120 g)
Instructions
Step 1: Mix the Dough
In a large mixing bowl or stand mixer, combine:
- Softened butter or coconut oil
- Honey or sugar
- Salt
- Active sourdough starter
- Room-temperature water
Add flour last and mix until a dough forms.
Adjust flour slightly if needed depending on the hydration of your starter.
Step 2: Knead
Knead the dough for about 10 minutes until smooth, stretchy, and elastic.
Perform the windowpane test by stretching a small piece of dough until thin without tearing.
Step 3: First Rise
Place dough in a lightly greased bowl.
Cover and allow to rise in a warm place for 10–12 hours or until doubled in size.
Step 4: Shape the Loaves
Grease or line two loaf pans with parchment paper.
Divide dough into two equal portions.
Roll each piece into a rectangle, then tightly roll into loaf shapes.
Place into prepared pans.
Step 5: Second Rise
Allow loaves to rise at room temperature for 2–4 hours until doubled and puffy.
Optional: Brush tops with egg wash for a golden crust.
Step 6: Bake
Preheat oven to 375°F (190°C).
Bake for approximately 45 minutes or until golden brown.
The loaves should sound hollow when tapped.
Step 7: Cool
Remove bread from pans and cool completely before slicing.
Notes
- Use a strong active sourdough starter for best results
- Avoid over-proofing the dough
- Keep dough in a warm environment during fermentation
- Bread stores well at room temperature for up to 5 days
- Freeze for longer storage if needed
