If you love rich chocolate brownies and soft chewy cookies, these Gluten-Free Sourdough Brownie Cookies combine the best of both desserts into one irresistible treat. With crisp crackly tops, gooey chocolate centers, and deep cocoa flavor, these cookies deliver everything people crave in a bakery-style chocolate dessert — while also making excellent use of sourdough discard.
These homemade brownie cookies are intensely chocolatey, naturally chewy, and perfectly balanced with a hint of sea salt. The addition of sourdough starter gives the cookies a subtle depth of flavor while improving texture and reducing waste from your sourdough baking routine.
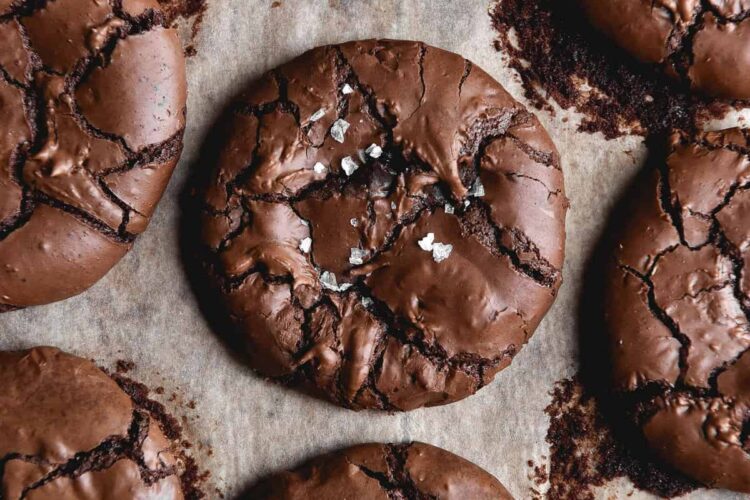
Unlike traditional cookies, these brownie-style cookies have a glossy top similar to classic brownies. The inside stays soft and fudgy while the exterior develops delicate crisp edges. Best of all, they’re naturally gluten-free thanks to tapioca flour and cocoa powder, making them a fantastic dessert option for anyone avoiding wheat.
Whether you’re baking for holidays, chocolate cravings, parties, or simply searching for creative sourdough discard recipes, these gluten-free brownie cookies are guaranteed to impress.
Why These Gluten-Free Brownie Cookies Are So Popular
Chocolate lovers adore these cookies because they combine the texture of brownies with the convenience of cookies.
Rich Chocolate Flavor
The combination of:
- Dark chocolate
- Cocoa powder
- Browned butter
creates deep, luxurious chocolate flavor in every bite.
Crackly Brownie Tops
One of the signature features of brownie cookies is the shiny crackled surface.
This texture forms when:
- Eggs and sugar are whipped properly
- The batter bakes quickly
- Chocolate melts smoothly
The result looks just like classic brownies.
Soft and Chewy Texture
These cookies remain:
- Gooey in the center
- Crisp around the edges
- Soft after cooling
- Extra chewy
The sourdough discard helps contribute to this tender texture.
Naturally Gluten-Free
Tapioca flour replaces traditional wheat flour while maintaining:
- Structure
- Chewiness
- Soft interior
This makes the cookies ideal for gluten-free dessert lovers.
What Makes Sourdough Brownie Cookies Unique?
Sourdough discard may seem unusual in cookies, but it works beautifully in chocolate desserts.
The sourdough starter:
- Adds moisture
- Enhances texture
- Deepens flavor
- Balances sweetness
Because chocolate is the dominant flavor, the sourdough tang remains subtle and pleasant.
Why Sourdough Discard Is Perfect for Desserts
Many home bakers search for creative sourdough discard recipes beyond bread.
Desserts are ideal because discard:
- Adds complexity
- Prevents waste
- Improves texture
- Enhances chewiness
Brownie cookies are one of the easiest and most delicious ways to use leftover starter.
Key Ingredients Explained
Each ingredient contributes to the texture, flavor, and appearance of these gluten-free brownie cookies.
Butter
Butter provides:
- Richness
- Flavor
- Moisture
Browning the butter takes the flavor even further by creating nutty caramel notes that pair perfectly with dark chocolate.
Why Brown Butter Makes a Difference
Brown butter adds:
- Toasty flavor
- Deep richness
- Caramel undertones
- Gourmet bakery-style taste
It transforms ordinary cookies into something much more sophisticated.
Dark Chocolate
Dark chocolate is the foundation of these cookies.
Using quality chocolate creates:
- Rich cocoa flavor
- Smooth texture
- Better melting consistency
Chocolate with around 70% cocoa provides the perfect balance between sweetness and intensity.
Caster Sugar
Caster sugar dissolves quickly and helps create:
- Crackly tops
- Glossy finish
- Soft texture
Properly whipping sugar with eggs is essential for brownie-style cookies.
Egg
Egg provides:
- Structure
- Lift
- Moisture
- Glossy texture
Whipping the egg well creates airy structure inside the cookies.
Sourdough Starter Discard
Sourdough discard contributes:
- Moisture
- Mild tanginess
- Texture enhancement
- Flavor complexity
Both active starter and discard work beautifully.
Cocoa Powder
Cocoa powder intensifies the chocolate flavor.
Both:
- Dutch-processed cocoa
- Natural cocoa powder
work well in this recipe.
Tapioca Flour
Tapioca flour keeps the cookies gluten-free while adding:
- Chewiness
- Soft texture
- Structure
It works especially well in fudgy cookie recipes.
Baking Powder
A small amount of baking powder helps:
- Slightly lift the cookies
- Prevent overly dense texture
- Maintain softness
Salt
Salt enhances chocolate flavor while balancing sweetness.
Sea salt flakes on top create a delicious sweet-and-salty contrast.
Vanilla Bean Paste
Vanilla adds warmth and depth to the chocolate flavor.
Although optional, it enhances the bakery-style taste significantly.
Why the Egg and Sugar Must Be Whipped Properly
One of the secrets to shiny crackled brownie tops is whipping the egg and sugar mixture long enough.
During whipping:
- Air gets incorporated
- Sugar dissolves
- Texture lightens
This helps create:
- Glossy tops
- Delicate crust
- Light chewy interior
Skipping this step can lead to flatter, denser cookies.
Step-by-Step Guide to Gluten-Free Brownie Cookies
Step 1: Brown the Butter
Preheat the oven to:
180°C (320°F)
In a small saucepan, melt the butter over medium heat.
Continue cooking until:
- Butter becomes golden brown
- Milk solids darken slightly
- Nutty aroma develops
The browned butter should weigh about 40g after cooking.
Step 2: Melt the Chocolate
Create a double boiler by placing a heatproof bowl over simmering water.
Add:
- Browned butter
- Dark chocolate
Stir until smooth and fully melted.
Set aside to cool slightly.
Why Gentle Melting Matters
Slow melting prevents chocolate from:
- Burning
- Seizing
- Becoming grainy
Smooth melted chocolate creates silky cookie batter.
Step 3: Whip Egg and Sugar
In a stand mixer, whisk:
- Caster sugar
- Egg
Beat for:
7–10 minutes
until the mixture becomes:
- Pale
- Thick
- Slightly fluffy
This step is critical for achieving brownie-cookie texture.
Step 4: Mix Dry Ingredients
In a separate bowl, whisk together:
- Cocoa powder
- Tapioca flour
- Baking powder
- Salt
This ensures even distribution throughout the batter.
Step 5: Add Sourdough Starter
Reduce mixer speed and add:
- Sourdough starter discard
Mix until fully incorporated.
Step 6: Add Melted Chocolate
Slowly pour the melted chocolate mixture into the whipped eggs.
Mix gently until smooth.
The batter should become glossy and rich.
Step 7: Add Dry Ingredients
Gradually spoon in the dry ingredients while mixing slowly.
Scrape the bowl as needed to ensure everything combines evenly.
Step 8: Add Vanilla
Mix in vanilla bean paste if desired.
This enhances the overall chocolate flavor beautifully.
Understanding the Batter Texture
The finished batter should be:
- Thick
- Glossy
- Pourable
- Softer than cookie dough
This thinner texture helps create shiny crackled tops.
Step 9: Prepare Baking Trays
Lightly grease or dampen baking trays before lining with parchment paper.
This helps keep the paper from sliding while scooping batter.
Step 10: Scoop the Cookies
Using two spoons, scoop about:
1½ tablespoons batter per cookie
Leave space between cookies because they spread during baking.
Aim for smooth rounded shapes.
Step 11: Add Sea Salt Flakes
Sprinkle each cookie lightly with sea salt flakes.
This creates a perfect contrast against the sweet chocolate flavor.
Step 12: Bake the Cookies
Bake for:
6–7 minutes
until:
- Tops crackle
- Edges set slightly
- Centers remain soft
Swap trays halfway through baking for even cooking.
Why Slight Underbaking Creates Better Texture
Brownie cookies continue setting while cooling.
Slight underbaking keeps them:
- Gooey
- Soft
- Chewy
- Fudgy
Overbaking may make them dry.
Cooling Is Important
Allow cookies to cool fully on the baking tray.
During cooling:
- Texture firms up
- Centers become chewy
- Crackly tops stabilize
The cookies taste even better once completely cooled.
Best Ways to Serve Brownie Cookies
These cookies are delicious:
- Warm
- Chilled
- Freshly baked
- With coffee
- With ice cream
They also make beautiful holiday cookie trays.
Delicious Variations
Chocolate Chip Brownie Cookies
Add dark chocolate chunks for extra richness.
Espresso Brownie Cookies
Add a pinch of espresso powder to deepen chocolate flavor.
Nutty Brownie Cookies
Add chopped walnuts or pecans for crunch.
Tips for Perfect Brownie Cookies
Use Quality Chocolate
High-quality dark chocolate creates better flavor and texture.
Don’t Skip Whipping the Eggs
This step creates shiny crackled tops.
Avoid Overbaking
Soft centers create the best chewy texture.
Cool Completely
The cookies continue setting as they cool.
Common Mistakes to Avoid
Flat Cookies
Can happen if:
- Batter is too warm
- Eggs weren’t whipped enough
Dry Texture
Usually caused by overbaking.
No Crackly Tops
Often caused by:
- Insufficient whipping
- Improper sugar dissolution
Storage Instructions
Refrigerator
Store cookies in an airtight container in the refrigerator for several days.
Freezing
Freeze baked cookies for up to 2 months.
Nutritional Information
Approximate per serving:
- Calories: 300 kcal
- Rich in chocolate flavor
- Gluten-free
- Soft and chewy texture
Values vary depending on chocolate used.
Why You’ll Love This Recipe
These Fudgy Gluten-Free Sourdough Brownie Cookies deliver everything chocolate lovers crave — shiny crackled tops, gooey centers, rich cocoa flavor, and chewy texture. The addition of sourdough discard adds subtle depth while making the cookies even softer and more flavorful.
They’re easy to prepare, naturally gluten-free, and perfect for using leftover sourdough starter in a creative and delicious way. Whether served for holidays, dessert platters, or everyday chocolate cravings, these brownie cookies are guaranteed to disappear quickly.
Gluten-Free Sourdough Brownie Cookies
Recipe Information
Course: Desserts, Sourdough Recipes
Servings: 4 servings
Prep Time: 20 minutes
Cook Time: 15 minutes
Calories: 300 kcal
Ingredients
- 50g butter
- 200g dark chocolate (70% sweetened cooking chocolate)
- 150g caster sugar
- 1 extra-large egg
- 110g sourdough starter discard or active starter
- 20g cocoa powder
- 20g tapioca flour
- 1/4 teaspoon baking powder
- 1/4–1/2 teaspoon fine salt
- 1 teaspoon vanilla bean paste (optional)
- Sea salt flakes for topping
Instructions
Step 1: Brown the Butter
Preheat oven to 180°C (320°F).
In a saucepan, brown the butter until golden and fragrant.
Step 2: Melt Chocolate
Using a heatproof bowl over simmering water, melt:
- Browned butter
- Dark chocolate
Stir until smooth.
Set aside.
Step 3: Whip Egg and Sugar
In a stand mixer, whisk:
- Caster sugar
- Egg
Beat for 7–10 minutes until pale and fluffy.
Step 4: Mix Dry Ingredients
In another bowl, whisk together:
- Cocoa powder
- Tapioca flour
- Baking powder
- Salt
Step 5: Combine Batter
Add sourdough starter to the egg mixture.
Slowly pour in melted chocolate while mixing.
Gradually add dry ingredients until fully combined.
Mix in vanilla bean paste if using.
Step 6: Prepare Baking Trays
Line baking trays with parchment paper.
Scoop about 1½ tablespoons batter per cookie onto trays.
Sprinkle with sea salt flakes.
Step 7: Bake
Bake for 6–7 minutes until tops are crackly but centers remain soft.
Swap trays halfway through baking.
Step 8: Cool
Allow cookies to cool completely on trays before serving.
Notes
- Use quality dark chocolate for best flavor
- Do not overbake for chewy brownie texture
- Cookies firm up while cooling
- Store in an airtight container in the refrigerator
- Sea salt flakes enhance the chocolate flavor beautifully
